How to record
Download the sound file in stereo or multichannel, link is on page upload
This file can be written on a CD or DVD or streamed by a computer or added to a DAW session (Protools, Nuendo, Pyramix,…)
Play the file in stereo on your loudspeakers and record simultaneously with your microphone.
- start recording and then playing just after : there is a 5s starting silence so you have time to get to the listening position
- keep the mic fixed at listening position : sync bong is followed by 3s left sweep and right sweep. Sweep signal is a sine signal which frequency is changing from very low to highest frequencies
- voice «move mic to left » : place the mic fixed at about 30cm left to listening position, signal will be a 10s sweep on left followed by a sweep on right and a sweep of both channels together
- «move mic to right » : place the mic fixed at about 30cm right to LP, sweep on left followed by sweep on right and a sweep of both channels together
- «slowly move mic » : slowly move mic in a volume of about 1m3 around listening place : pink noise 20s on left channel, 20s on right channel, 10s of correlated noise on both channels followed by 10s of pink noise with phase between channels. In larger rooms, you can move mic in a larger volume : 1/5th of each dimension is a guideline.
- do not stop while playing or recording : the file has to be played and recorded in one pass
The easiest way is to use the record function available directly on the page Upload recording but it is an experimental function : depending on browser and operating system, you may have some clics or have level compression. So better record with another method for the moment.
You may record directly to your computer combined to a measurement mic, using the record function on page “Upload my record”.
On a computer, there are some free softwares to play and record simultaneously : ie Audacity has an overdub function (in preferences) : https://audacity.fr/
You can also use a portable recorder (Zoom or others) or your mobile phone with a usb mic : ie Iphone and Umik connected with a lightning-usb adapter.
Using a mobile phone, it is recommended to compare to measurements done another way to be sure than the recording feature of your phone does’nt reduce frequency response.
Record in uncompressed format .wav mono, 16bits or 24 bits, 44.1 or 48kHz (aiff or flac will be accepted later).
In all case be sure to avoid any process on the played sound file and on the recording : no EQ, compressor, limiter, filter,…
Record in uncompressed format .wav, .flac or .aiff mono, 16bits or 24 bits, 44.1, 48, 88.2 or 96kHz. Stereo files are also accepted but only left channel will be used : better record in mono, the upload is quicker ! Lossless compressed files in flac are also accepted and will speed the upload. The recording must start 15sec or less before the voice announcing “start to record now”. After the end of the sounds sequence, do not leave more than 30 seconds recording.
- sound level must be high enough, ie the voice level should be comparable to someone speaking in the room, also avoid any clipping on the recording
- notice that we have no responsibility due to too high levels : start with low levels
- record without filter, compression or any process or EQ (unless you do a measurement with correction EQ).
- the recommended mic is MiniDSP Umik, at a resonnable price under 100€, connected in usb so you need no preamp. This mic is delivered with an individual calibration file at 0 and 90° : https://www.minidsp.com/products/acoustic-measurement/umik-1 or http://www.audiophonics.fr/fr/micros-de-mesure/minidsp-umik1-micro-mesure-usb-omnidirectionnel-p-8269.html or https://www.amazon.com/miniDSP-UMIK-1-Measurement-Calibrated-Microphone/dp/B00N4Q25R8
- keep the mic vertically , pointing to ceiling, with the hand low on mic. Note that you have to send the corresponding calibration file (ie the one for 90°)
- for left, right, front and rear position, better change slightly mic height
- while sweeps, distance between positions is about 30cm for a studio or listening room and about 1m for a theater or large mixing room
- with pink noise, the volume scanned by the mic is about 1mx1mx0.5m (Lxlxh) for a listening room or a studio up to 3mx3mx1m for a large room (preferably use a mic boom)
- avoid any obstacle between loudspeakers and mic when moving mic
- don’t move mic less than 30cm of obstacles (seat, table, console,…)
- while moving mic, take care to constantly vary distance between mic and your body
- the way to move mic is not very important but allways move slowly to avoid wind noises, ie 30cm/second
- the whole stereo sequence is about 2mn 30 seconds
- synchronisation is automatically done by software : no need to precisely cut the record by keep less than 15sec before voice start and keep the whole record up to the end (sequence can be cut anywhere after end of sounds, but not too long to avoid excessive upload time ).
We recommend the MiniDSP Umik 1, which is a usb microphone so no need for a preamplifier. This mic gets two individual calibration files, one at 0° and one at 90°. But other calibrated mic can do the job. Even better if you get a random incidence response for your microphone.
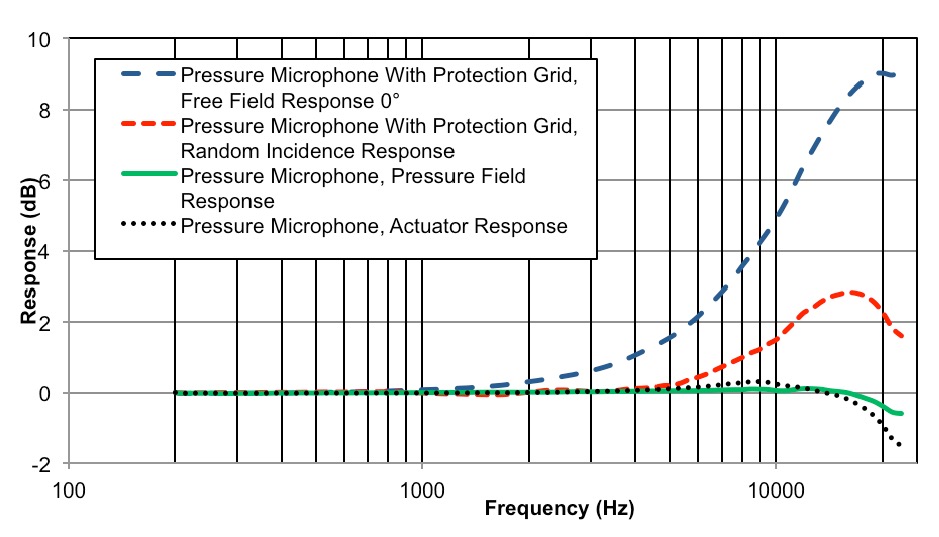
Preferably use the mic vertically and upload the 90° cal file. Ideally the right calibration would be for random incidence but more often you only get 0° and 90° responses. With a Umik the random incidence is nearly 3dB higher at 20kHz than the 90° response. It means that if you use the 90° calibration, you are a bit over-correcting and the real response of your loudspeakers is about 1dB lower at 10kHz and 3dB lower at 20kHz. See hereunder corresponding graph from IEC standards. You can see some examples on measurement mics websites such as GRAS or Bruel&Kjaer.
One type of measurement may be spoiled by cheap microphones : because some microphones have have quite a high intrinsic noise, the distortions figures may be hidden into the mic noise floor. This can be improved if measuring at a higher sound level (but be careful with your ears and louspeakers).
If you have a calibration file, send it together with the recording in the version corresponding to your use (ie version at 90° if mic was used vertically, as recommended). If you have no calibrated mic, choose None/flat. Important : the calibration file is the response of the microphone, not the correction to apply !
For Umik, send the manufacturer cal file. The level reported in the graphs is calculated with the recommended 18dB gain of the Umik together with the sensitivity from calibration file (this is important for multichannel movie setups to be in conformity with SMPTE standards).
For “Other”, send a file named “calibration.txt” with first line at 0Hz and last line at 24000Hz, with a space between frequency and level such as :
0 -20
20 -0.1
1000 0
20000 0.1
24000 -20
Your calibration files will be processed and saved as “response.mic” in the same folder. If you are sending new recordings the same day for the same studio, you don’t need to send the mic calibration file again.
If your calibration fike is not valid, it will be replaced by a flat mic response, same as without any cal file.
Measurement microphones, electret, electrostatics or MEMS, are generally considered as minimum phase devices in the frequency range we are interested in. So the calibration file does not need to have phase included but those files are valid if phase column is after amplitude column (but we do prefer cal file without phase to avoid mistakes).
If you have no calibration file, upload only the recording and no .txt file. The software will then use a flat calibration curve. Depending on your mic, the results above 5kHz may be wrong.
Start to play our sound file at low volume, adjust so that voice is at a realistic level. Following those advices, there is no risk for your loudspeakers.
For acoustic measurements, you really don’t need high sampling rate files to play or to record. So we choose to produce our sound files at 44.1 or 48kHz. For your recording, you can use any sample rate because the file will be resampled to 48kHz for analysis.
If you use a USB microphone such as the MiniDSP Umik, you may find a problem with your measured impulse response : the impulse itself is not clean and shows many peaks together instead of just one. This may come from USB problems : gliches or short drop-outs while recording gives such problem. The clock drift itself, coming from a mismatch between player clock and recording clock is compensated by resampling the log sine sweeps thanks to dual chirps at start and end of the audio sequence.
Glitches or drop-outs may be avoided by checking and optimising following parameters :
- remember that the max length of a non-damaged cable is about 3m for USB class 1 (so try with another certified cable)
- in windows configuration/system/advanced parameters : adjust for best performances and activate “background services”
- USB sharing : change USB port and try tu use a port not shared by other components,
- in BIOS, try to modify PCI bridge latency timer (PCIe don’t have latency timers)
- in BIOS, disable CPU throttling
- disable unused sound devices
- disabled all energy saving options and set power plan to max efficiency
- set highest priorities to the recording process
- deactivate temporarelly your antivirus
- some usefull links :
Optimise Audacity and computer
Optimising-your-PC-for-Audio-on-Windows-10
PC-Optimization-Guide-for-Windows-8
Troubleshoot-USB-dropouts-audio-glitches-Windows
Troubleshoot-USB-dropouts-audio-glitches-Mac
AES paper 8169 : Impulse response measurements in the presence of clock drift
And for everything related to audio on computers :