Form "Upload recording"
- Fields “Company or title” and “Studio” are used to rank measurements in a structure title/studio/date, date being automaticcaly written. So you can check evolution of performances in time and see any degradation. Important : do not use of company name for which you have no rights, your account may be terminated without notice.
- Field “Reference” : a folder with this field will be created. For home users with just one audio system, you may leave this field empty or fill with “home” or “listening room” or “without correction”, “with correction”, aso. For companies with more than one studio, you may enter the Studio name. If you want to upload more than one measurement, it is better to do it in different folders, this way graphs will be easier to read. You can hide your measurements to other users if you add “PRIVATE” in upper cases into your reference field,
- Accents and special characters are not allowed in most of the fields. Allowed characters are alphabets, numbers, space and underscore (_). No space or _ at start or end and no consecutive spaces or underscore.
- In “Volume” and “Distance”, just put the value ie “2.5” (ie the “m” in 2m is not allowed !)
- When a field is red because it is not correct, do not try to go on upload : correct the field before
- Field to choose Test/Measure/Correction : “Test” allows to verify if the record is valid to give correct measurements, even if you bought no plan.
- “New correction” is possibility to keep all values of the form and just change “Timbre target” and/or “LF target” to reprocess. You may want to change the record name so not to loose old corrections and be able to compare.
- For other fields, have a look at other FAQs.
- It is important to fill the form with no field in red and save it before to upload your recording. Otherwise you won’t get your graphs processed !
- And remember that all your fields values are saved for next time, so less work for you for future measurements !
In page “Upload recording“, you can upload a .wav, .flac or .aiff file for the recording and a .txt file for the mic calibration file. Max file size is 60MB.
In page “My files”, you can upload jpg and png picture files to your folders to show your room or loudspeakers.
Please do not use upload an old record you have done with an old audio file : compatibility is not assured and it’s better to download latest file and do a new recording to benefit from latest improvements
For stereo, the channels order is allways L R. But for multichannel setups, it is important to choose the real channel order so that the graphs show the exact channels : ie for 5.1, you can download L-C-R-LFE-Ls-Rs (movie order which is left, center, right, LFE, left surround, right surround) or L-R-C-LFE-Ls-Rs (SMPTE order). Also check which file you have downloaded : .flac files use SMPTE order (see https://xiph.org/flac/format.html ).
The audio files to download and play are named by convention :
LA2v4 means Loudspeakers.Audio file, for 2 channels (stereo), version 4.
And so on for LA51v4, LA71v4, LA712v4, LA714v4,….
It really depends on your loudspeakers. In some cases, if you want to adjust the slope of the target curve, you could change the directivity at low or high frequencies set in the form.
For reference, here are the values used for calculation :
High frequencies, Omni/Dipole/Standard/Horn = 2/5/8/12
Low frequencies, Omni/Dipole = 2/5
Following fields are needed for the calculation of your optimised target curve :
- Field “Target curve” : “Auto music” is recommended for home HiFi and pro music studios. For calibration of theaters or mixing rooms, SMPTE targets maybe be used with a choice depending on room size. Other possibilities are AES and B&K bin some cases. The new “Dolby Atmos Music” target has been added to comply to Dolby Home Entertainment specifications.
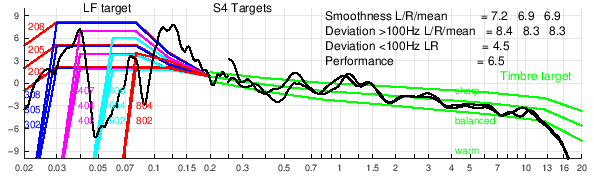
- “Timbre target” (only valid if “Auto music” is choosen) : the standard “Balanced” can be adjusted on user preferences to Bright (sharp, more high frequencies) or Warm (darker, more low frequencies). Difference to “Balanced” is a slope of approximatively +-0.3dB/oct (exact value depends on measurements, distances and directivity) so nearly +2dB at 10kHz for “Sharp” and -2dB at 10kHz for “Warm”. If those standard “bright, balanced, warn” don’t exactly fit your needs, you may ajust by modifying your volume or distance values : increase volume or decrease distance brings you more in direct sound so targets change a bit to more “bright”.
- “LF target” (only valid if “Auto music” or “Auto cinema” is choosen) : low frequency target is defined by cutoff frequency and level under 100Hz ie “409” means a 40Hz cut and +9dB level. Level at cutoff freq and at 130Hz is 0.5*max level. As LF target Auto is optimised for both speakers together (L+R), so to get a flat response for each separated channels, choose a value ending with 3 (ie 403 or 603), because L+R in low frequencies gives nearly +3 or 4 dB compared to response of L or R separated. With lower taps value (ie 3072 or less), to get expected response (see simulations in p7) better use 100/103/106/109 values to avoid adding a cutoff to the correction already limited by number of taps.
After the target curve is calculated, it is available in ‘My measurements’ as ‘target.drc’ so you may use this target for other purposes or in another correction software.
The whole procedure gives a calculation of the so-called “house curve”. It is based on the recording itself (ie the calculated frequency dependant reverberation time) but also on parameters you entered in the form : room volume, distance, directivities. Note that if you choose SMPTE, AES or B&K curves, those will directly be used as targets and no calculation adapted to your own setup (in this case, LF and timbre target won’t be used)
To suit your needs, you can choose “Auto music” and adjust the target with Timbre target and LF target :
- LF target choice between 100 to 806
- Timbre target bright/balanced/warm
Those choices you can set on the Upload recording form. The timbre target slopes are not fixed but depend on your measurement. If you know that your loudspeakers are quite neutral from a high quality manufacturer, and you are quite happy with the overall soud balance, we would suggest to choose the target that is the nearest to your measured curve, ie here the “balanced” one.
At bottom of the form in page “Upload my recording”, depending on your plan, you can choose between some options :
- “Test” gives the possibility to verify if the record is valid and if it will give correct measurements, see here.
- “Measure” starts the analysis of uploaded file to write Measurement graphs.
- “Measure and correct” adds calculation of FIR correction corresponding to your processor.
- “New correction” keeps all values of the form, so you just change “Timbre target” and/or “LF target” to reprocess. You can change the record name and upload again so you will not rewrite on old corrections and keep possibility to compare.
Page TEST p6 shows graphs Rec1 to Rec5
| Real measurement |
Idéal curves (simulated) |
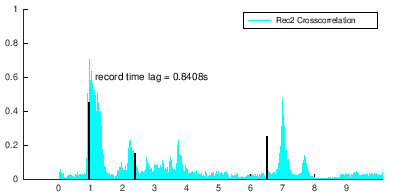 Graph Rec2 shows detail of non synchonised record Graph Rec2 shows detail of non synchonised record |
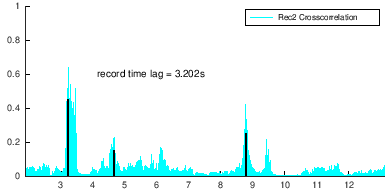 Synchronisation is correct when value “record time lag” corresponds to max and 3 black lines are aligned to peaks. Synchronisation is correct when value “record time lag” corresponds to max and 3 black lines are aligned to peaks. |
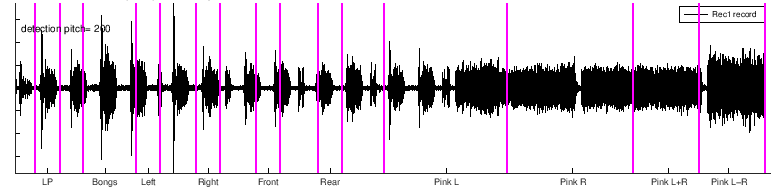 Unvalid Rec1 because lines are not aligned to parts on the graph. Unvalid Rec1 because lines are not aligned to parts on the graph. |
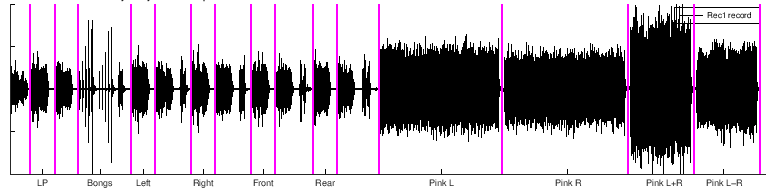 Valid : purple lines should be temporally separating parts. Valid : purple lines should be temporally separating parts. |
This website is meant to share loudspeakers measurements in rooms, it is nice no to hide your graphs. But if for any reason, you prefer to keep your results hidden, you need to buy a PRIVATE plan.
When you bought the plan, just add PRIVATE in upper cases in the “Reference, Studio” name in the Upload recording form. You can delete PRIVATE later from the name if you change your mind.
Depending on our server workload, it will generally take 5 to 10 minutes to get all your results. Be sure to use the refresh button to see the actual files.
For some reason, you may get not measurement graphs (don’t forget to use refresh button before complaining !).
First check : be sure that you have correctly FILLED all needed fields in the upload form and SAVED the form. Also check that your recorded sound file has a valid format, contains the start of sequence and does not start more than 15 seconds before the first voice.
After having checked, detelete all files in your studio/reference folder (use the menu “My measurements”) and upload your files another time but giving it another name.
Other infos you’ll find in FAQ Problems and Errors.
Please do not uploads many recorded files one after the other : this could bring to problems of mixing wrong form with wrong record due to uploads time.
Do your recording, upload corresponding record, do another recording and upload after.